Blacksmithing has always been the go‑to profession for plate wearers (![]() Warriors,
Warriors, ![]() Paladins,
Paladins, ![]() Death Knights) and anyone who wants to craft weapons. In Midnight, it’s even more valuable because of three things:
Death Knights) and anyone who wants to craft weapons. In Midnight, it’s even more valuable because of three things:
- Crafting Orders – Players constantly request crafted gear, especially early in the season when drops are scarce.
- Housing décor – New in Midnight; players want fancy chandeliers, anvils, and weapon racks for their houses.
- Profession tools – Every crafting profession needs Blacksmith‑made items (mining picks, blacksmith hammers, etc.).
![]() The best part? Ore is abundant. With Mining as your pairing, you can gather everything you need for free. Buying from the AH is possible but cuts into your margins.
The best part? Ore is abundant. With Mining as your pairing, you can gather everything you need for free. Buying from the AH is possible but cuts into your margins.
![]() This guide walks you through leveling from 1 to 100, choosing specializations, and turning metal into gold.
This guide walks you through leveling from 1 to 100, choosing specializations, and turning metal into gold.
Midnight Blacksmithing Trainer and Crafting Table Location
![]() In Midnight, profession trainers are centralized in Silvermoon City’s new crafting quarter – the Bazaar of the Sun.
In Midnight, profession trainers are centralized in Silvermoon City’s new crafting quarter – the Bazaar of the Sun.
Trainer: Bemarrin (near the forge)
Coordinates: /way #2393 48.5 61.9
Crafting stations (anvils, forges) are right next to the trainer. You can learn recipes and start crafting without moving.
If you already had Blacksmithing from a previous expansion, you can skip the trainer and just start smelting Midnight ores – the new recipes will appear automatically.
Midnight Blacksmithing Specs Explained
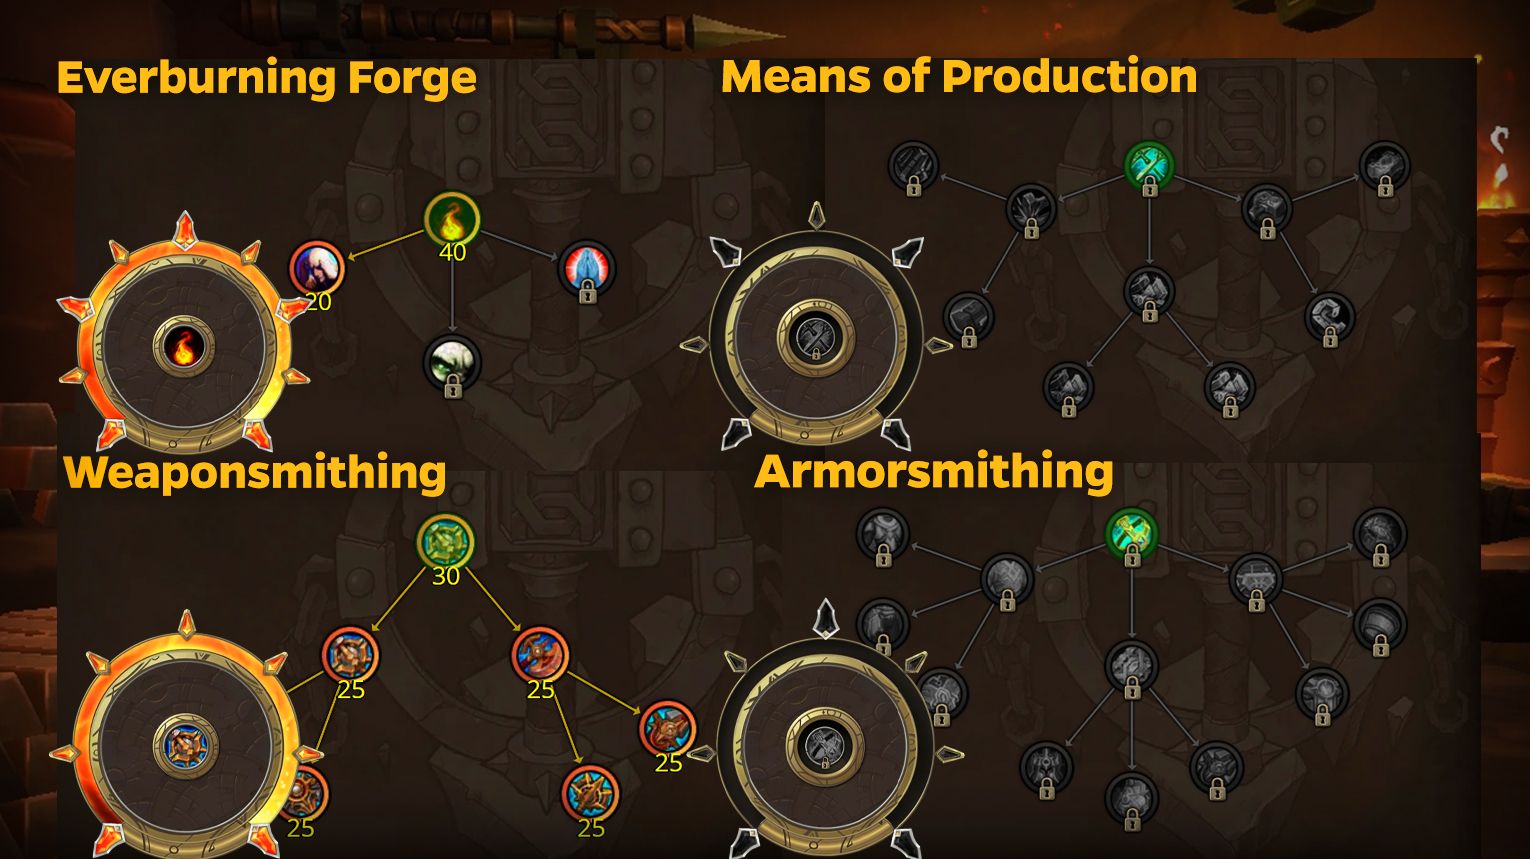
![]() You unlock specializations at skill levels 25, 50, and 75. Each tree has 20–30 KP to fully unlock.
You unlock specializations at skill levels 25, 50, and 75. Each tree has 20–30 KP to fully unlock.
1. The Old Ways – Best Early Choice (Start Here)
![]() Focus: Core crafting stats – Ingenuity, Resourcefulness, Multicraft.
Focus: Core crafting stats – Ingenuity, Resourcefulness, Multicraft.
Key talents:
- Ingenuity Boost – chance to use less Concentration (saves your daily crafting limits).
- Resourcefulness – chance to save materials (huge for expensive alloys and gear).
- Multicraft – chance to craft extra items (great for consumables like sharpening stones).
Best for: Everyone. This tree improves everything you do, regardless of whether you craft gear, tools, or consumables.
Recommendation: Put your first 20–25 KP into The Old Ways to unlock the efficiency talents. Then decide your gear path.
2. Craftsmithing – Best for Tools & Crafting Orders
![]() Focus: Profession equipment (mining picks, blacksmith hammers, etc.) and accessories.
Focus: Profession equipment (mining picks, blacksmith hammers, etc.) and accessories.
Key talents:
- Tool Mastery – unlock blue/purple quality tools.
- Multicraft on Tools – chance to craft extra tools (saves you time).
- Concentration Efficiency – craft high‑quality tools with fewer resources.
Best for: Players who want consistent Crafting Orders. Every miner, engineer, and jeweler needs your tools. Steady demand.
3. Armorsmithing – Best for Plate Wearers
![]() Focus: Crafting plate armor (chest, legs, helm, shoulders, gloves, boots, belt, bracers).
Focus: Crafting plate armor (chest, legs, helm, shoulders, gloves, boots, belt, bracers).
Key talents:
- Plate Specialization – unlock high‑end plate recipes (ilvl 260–280).
- Embellishment Access – add special effects to armor (e.g., “Breathe of the Forge” – extra strength proc).
- Quality Boost – higher chance to craft Rank 3 and Rank 4 items.
Best for: Personal gear or selling to other plate wearers. Early in the season, a crafted 4‑piece set can carry you through raids.
4. Weaponsmithing – Best for Weapon Crafting
![]() Focus: One‑handed and two‑handed weapons (swords, axes, maces, polearms).
Focus: One‑handed and two‑handed weapons (swords, axes, maces, polearms).
Key talents:
- Weapon Specialization – unlock weapon recipes for each type.
- Sharpening Stones – craft consumable stones that boost weapon damage.
- Concentration Efficiency – craft high‑quality weapons with lower material cost.
Best for: Goldmakers. Weapons sell for more than armor because players upgrade weapons first. Also sharpening stones have steady demand.
How Profession Knowledge Points Work in Midnight
![]() Knowledge Points (KP) are how you unlock specializations, recipes, and crafting bonuses. You earn them from:
Knowledge Points (KP) are how you unlock specializations, recipes, and crafting bonuses. You earn them from:
| Source | KP per action | Frequency |
|---|---|---|
| First Craft (each new recipe) | 1–3 | One time per recipe |
| Weekly quest from trainer | 3 | Every week |
| Crafting Orders (filling someone’s order) | 1 per order | First order of the week gives bonus |
| Profession treasures | 1–3 | One time (hidden across Midnight zones) |
| Vendor books (reputation rewards) | 10 | One time, expensive (10–15k gold) |
| Blacksmithing Treatises (crafted by Inscription) | 1 | Once per week |
Golden rule: Do your weekly quest every week. That’s 30–40 KP over a season. And never spend KP until you’ve chosen your specialization path – no resets.
Shopping List
![]() Don’t spread points evenly. Focus on one tree until you hit the key talent, then move to the next.
Don’t spread points evenly. Focus on one tree until you hit the key talent, then move to the next.
| Stage | Specialization | Why |
|---|---|---|
| Skill 25–50 | The Old Ways (first 25 KP) | Unlock Ingenuity and Resourcefulness – saves materials and Concentration |
| Skill 50–75 | Choose your path: Armorsmithing or Weaponsmithing | Based on your class or gold goals |
| Skill 75+ | Craftsmithing (if doing Crafting Orders) or finish your gear tree | Tools are steady sellers; gear has higher individual profit |
| Endgame | Dump remaining KP into the tree you didn’t finish | Optional, but more stats always help |
Midnight Blacksmithing 1-100 Leveling
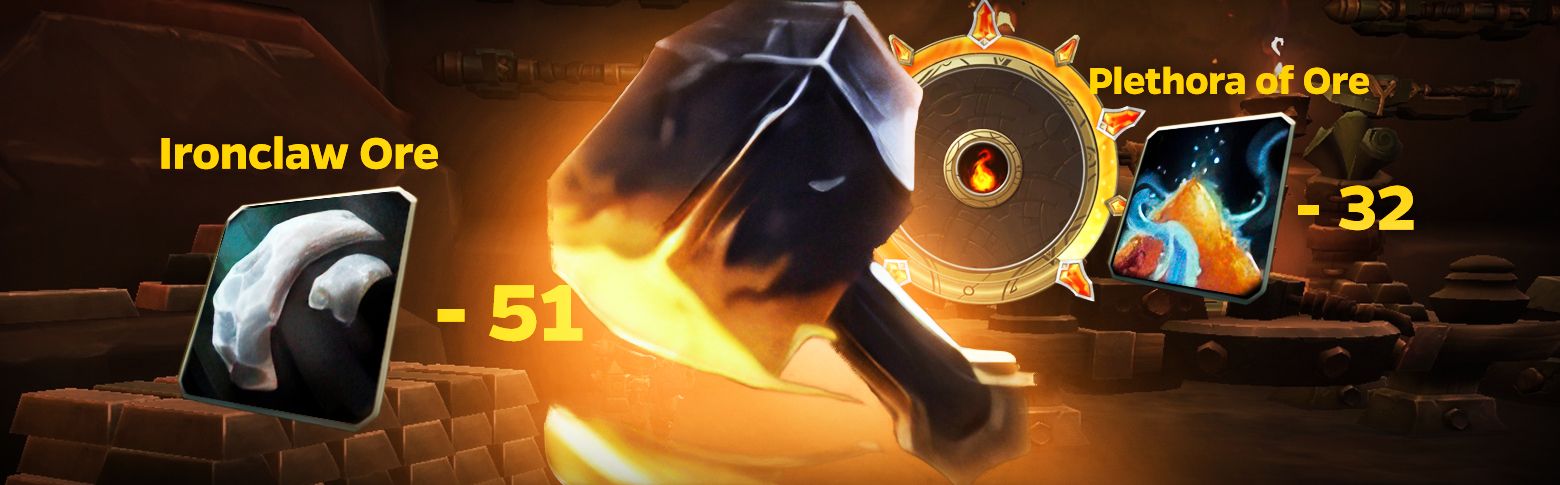
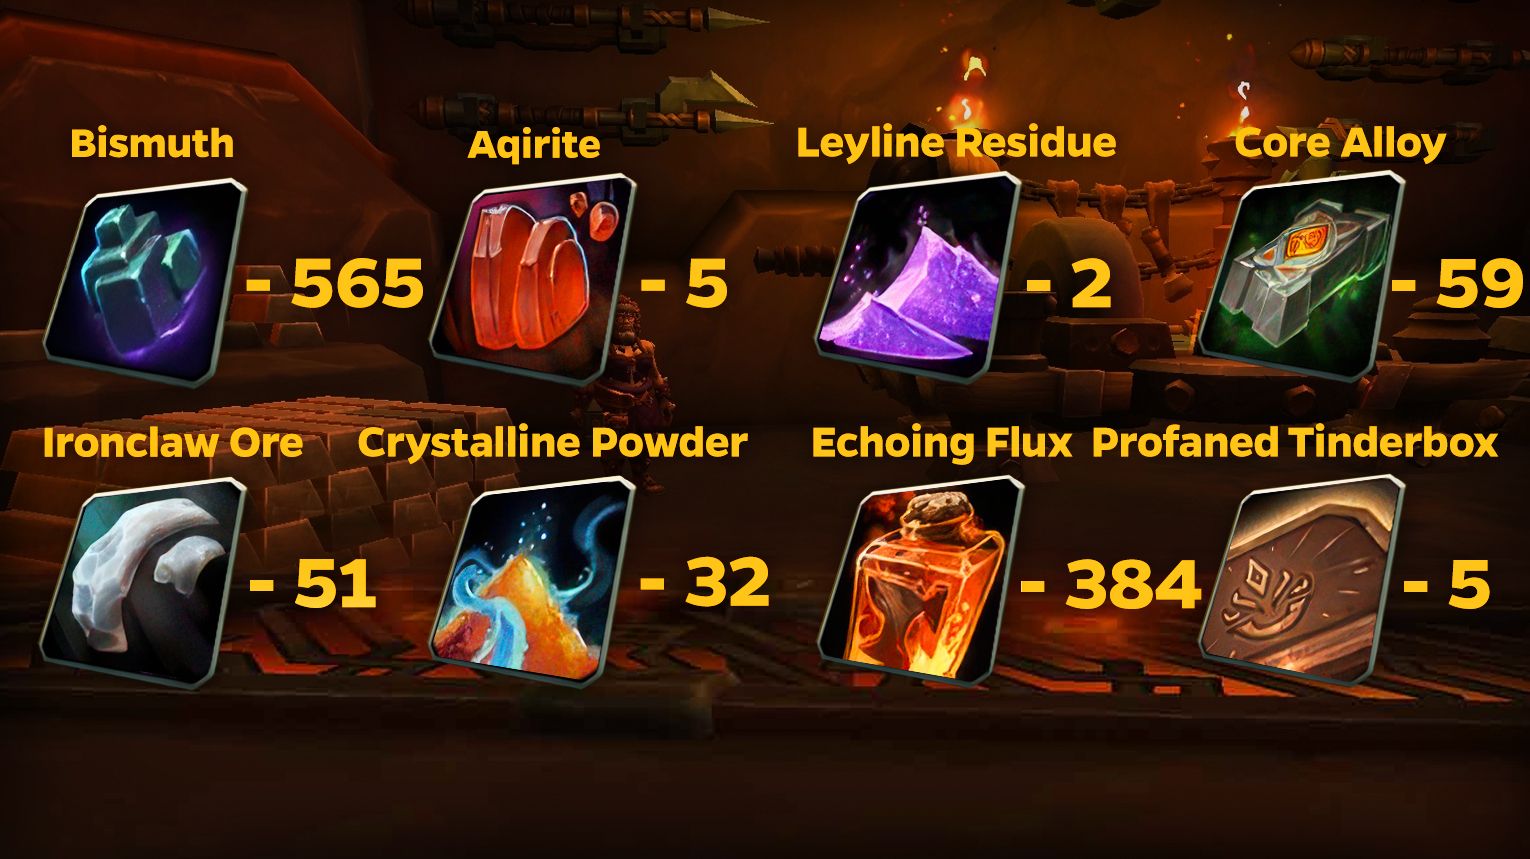
![]() Leveling Blacksmithing is about smelting ores into alloys, then crafting items. The key is to milk every first craft for KP and use the most material‑efficient recipes.
Leveling Blacksmithing is about smelting ores into alloys, then crafting items. The key is to milk every first craft for KP and use the most material‑efficient recipes.
Materials You’ll Need
![]() You can buy ore from the AH or gather it with Mining. Quality doesn’t matter for leveling – buy the cheapest (Rank 1).
You can buy ore from the AH or gather it with Mining. Quality doesn’t matter for leveling – buy the cheapest (Rank 1).
| Ore type | Zone (best farm) | Approximate cost per stack (AH, early season) |
|---|---|---|
| Refulgent Copper | Eversong Woods | 100–150g |
| Brilliant Silver | Ghostlands, Zul’Aman | 200–300g |
| Umbral Tin | Harandar, southern caves | 250–350g |
| Dazzling Thorium | Voidstorm (rare nodes) | 1,000–2,000g (avoid for leveling) |
For 1–70, stick to Refulgent Copper, Brilliant Silver, and Umbral Tin. Dazzling Thorium is for endgame crafts only.
Step 1 – Smelting (Skill 1–15)
Smelting turns ore into bars. Each skill point takes 2–3 smelts.
- 1–10: Smelt Refulgent Copper → Copper Bar
- 10–15: Smelt Brilliant Silver → Silver Bar
Number of ores needed: ~60–80 of each.
Tip: Smelt in bulk (50 at a time). The smelting window has a “smelt all” button.
Step 2 – Basic Alloys (Skill 15–30)
Alloys combine two metals into a stronger material. This is where value starts to multiply.
- 15–25: Craft Bronze Bar (1 Copper Bar + 1 Silver Bar)
- 25–30: Craft Tinsteel Bar (2 Tin Bar + 1 Copper Bar – you need to smelt Umbral Tin into Tin Bar first)
Bars needed: ~40–50 of each alloy.
Pro tip: Craft each alloy type at least once for the First Craft KP.
Step 3 – Starter Gear & Tools (Skill 30–50)
Now craft simple items that use your alloys. These give good skill points and are cheap.
| Recipe | Materials | Skill per craft | Notes |
|---|---|---|---|
| Copper Hammer (tool) | 5 Copper Bar, 2 Tin Bar | 2–3 | Vendor trash, but cheap |
| Bronze Gauntlets | 8 Bronze Bar, 2 Void‑Tempered Leather | 2–3 | Void‑Tempered Leather is cheap on AH |
| Tinsteel Dagger | 6 Tinsteel Bar, 1 Hilt (vendor) | 2–3 | Sell to vendor for 20–30g |
Crafts needed: ~15–20 items. Focus on the cheapest recipe (Copper Hammer) unless you want to try the AH.
Tip: Equip a Blacksmith’s Apron (crafted or bought) – it gives +Resourcefulness, saving materials.
Step 4 – Profession Tools (Skill 50–70)
At this point, you can craft blue‑quality profession tools. These are always in demand.
| Recipe | Materials | Skill per craft | Sell price (AH) |
|---|---|---|---|
| Hardened Mining Pick | 12 Tinsteel Bar, 2 Reinforced Handle | 2–3 | 800–1,200g |
| Sturdy Blacksmith Hammer | 15 Bronze Bar, 1 Leather Grip | 2–3 | 600–900g |
| Engraved Scribe’s Quill (off‑hand for Inscription) | 10 Tinsteel Bar, 2 Quill Feather | 2–3 | 1,000–1,500g |
Crafts needed: ~15–20 tools. You won’t sell all of them – the market is small. But you can recoup some costs.
Alternative: If tools are too expensive, craft Bronze Legplates (8 Bronze Bar, 2 Cloth) – cheap, decent skill, vendor for 15g.
Pro tip: Use your own tools to craft more tools. Resourcefulness procs will save you bars.
Step 5 – High‑End Gear & Weapons (Skill 70–100)
The last 30 points are the hardest. You have four options.
Option A – Crafting Orders (Highly Recommended)
Post your own order for a high‑level item (e.g., “Voidsteel Chestplate” or “Dazzling Thorium Greatsword”).
- Cost: Only commission (300–800g per order)
- Skill per order: 2–3
- Speed: Slow (depends on other players), but very cheap
Option B – Weaponsmithing Route
Craft sharpening stones or simple weapons:
- Sharpening Stone (2 Tinsteel Bar, 1 Coarse Abrasive) – skill 1 point, cost 150g, sells for 100g (small loss).
- Steel Longsword (12 Steel Bar, 2 Void‑Tempered Leather) – cost 400g, vendor for 200g (loss).
- Goal: Mass craft cheap items to push to 100. Expect to lose 2–3k gold.
Option C – Armorsmithing Route
Craft “Reinforced Plate Belt” or “Void‑Tempered Bracers”.
- Cost per craft: 500–800g
- Sellability: Low (players only buy belts/bracers with good stats).
- Expected loss: Higher than weaponsmithing.
Option D – Darkmoon Sigils
If you have Inscription on an alt, craft “Darkmoon Sigil of the Forge” (requires Blacksmithing 85+).
- Materials: 4 Dazzling Thorium Bar, 2 Darkmoon Card (expensive).
- Skill per craft: 3–4 points.
- Profit potential: Sigils sell for 5–10k on AH (used for crafting legendary weapons). High risk, high reward.
Efficiency choice: Use Crafting Orders for most of 70–90. Then finish with 3–4 Darkmoon Sigils if you have the capital, or mass craft sharpening stones if you’re on a budget.
Crafting Orders – Your Best Friend After 70
Crafting Orders are how you level cheaply after skill 70. Players post requests for items, you fill them, and you get:
- Skill points (2–3 per order, even at 95+)
- Commission gold (500–2,000g for rare recipes)
- Often materials provided for free
How to find orders: Open Crafting Orders UI (default: ; then select “Blacksmithing”). Look for orders that don’t require rare materials you don’t have.
Pro tip: Specialize in one niche (e.g., “mining picks” or “plate belts”). Build a reputation in trade chat. Repeat customers will whisper you directly.
Example macro for trade chat:
/2 [Blacksmithing] Can craft all plate armor (chest, legs, helm) up to ilvl 275. Provide mats, 2k commission. Whisper for details.