
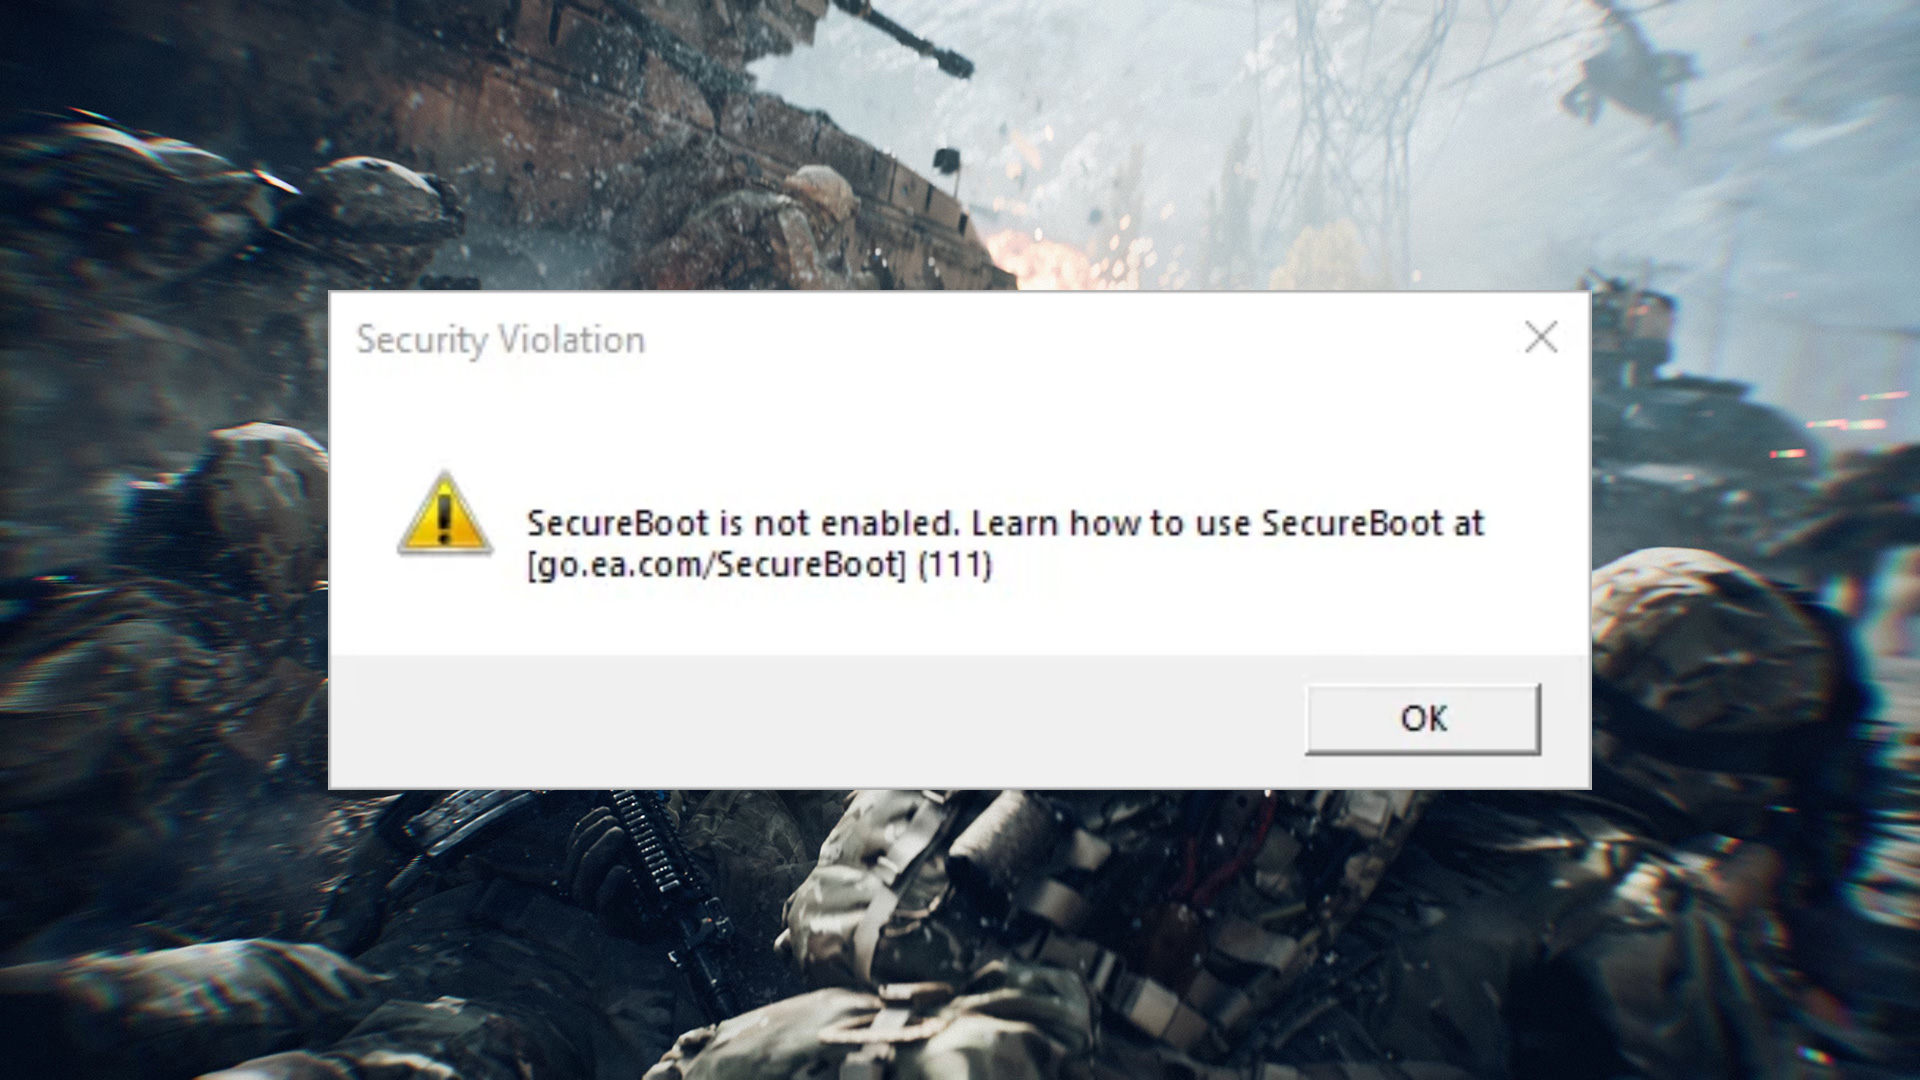
![]() So Battlefield 6 ships with a much stricter version of EA Anti-Cheat than anything the series has done before. It’s not just software-level monitoring anymore — the game actually checks your hardware during startup. Specifically, it won’t run unless Secure Boot and TPM 2.0 are both active on a Windows 11 machine. If you’re hitting that “Secure Boot is not enabled on this machine” error when launching through the EA App or Steam, you’re stuck until you sort out the BIOS. This guide walks through the whole thing — what Secure Boot actually is, why EA bothered requiring it, and how to turn it on without breaking your PC.
So Battlefield 6 ships with a much stricter version of EA Anti-Cheat than anything the series has done before. It’s not just software-level monitoring anymore — the game actually checks your hardware during startup. Specifically, it won’t run unless Secure Boot and TPM 2.0 are both active on a Windows 11 machine. If you’re hitting that “Secure Boot is not enabled on this machine” error when launching through the EA App or Steam, you’re stuck until you sort out the BIOS. This guide walks through the whole thing — what Secure Boot actually is, why EA bothered requiring it, and how to turn it on without breaking your PC.
Why Does Battlefield 6 Require Secure Boot?
Look, a lot of people are annoyed by this. Especially if you’re on older hardware that needs extra steps. But honestly, by 2026 this has become pretty standard for any competitive shooter that takes cheating seriously.
![]() Here’s what’s actually going on under the hood: Secure Boot is a UEFI-level protocol that acts as a gatekeeper the moment you press the power button.
Here’s what’s actually going on under the hood: Secure Boot is a UEFI-level protocol that acts as a gatekeeper the moment you press the power button.
- Stopping cheats before Windows even loads: The nastier cheats out there don’t wait for Windows to boot — they inject malicious drivers during the startup sequence, before anti-cheat software has a chance to do anything. Secure Boot blocks this by making sure only properly signed Microsoft-verified drivers load. If something isn’t signed correctly, it simply doesn’t run.
- Windows 11 and the Trusted Environment thing: Windows 10 technically supports Secure Boot, but Windows 11 treats it as a core part of the OS security model. BF6 specifically uses something called Virtualization-based Security (VBS) that only works when Secure Boot is active. No Secure Boot, no Trusted Environment, no game.
- TPM and hardware bans: Secure Boot works alongside your TPM chip, and together they generate a hardware ID tied to your specific machine. This is what makes bans actually stick. You can’t just make a new account and keep cheating — you’d need to physically swap out motherboard components to get around it.
How to Check Your Secure Boot Status
Before you start digging through BIOS menus, take two minutes to check what’s actually going on in Windows first. It’ll save you time and unnecessary risk.
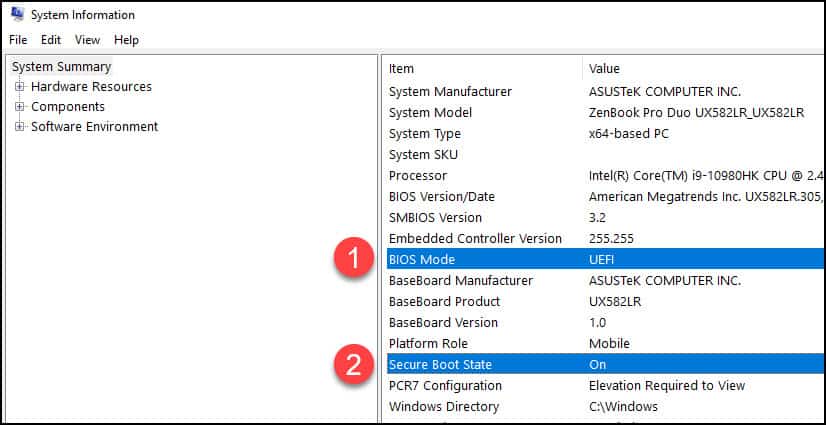
![]() Check it using System Information (msinfo32):
Check it using System Information (msinfo32):
1. Hit Windows Key + R to open the Run box.
2. Type msinfo32 and press Enter.
3. In the System Summary panel, look for “Secure Boot State” and “BIOS Mode.”
- Secure Boot State: On — It’s already running. If BF6 is still throwing an error, the problem is probably a corrupted game file or something in the EA App cache. Try repairing the game install first before touching BIOS.
- Secure Boot State: Off — Your hardware supports it, but it’s switched off. This is the most common situation on custom-built PCs. You just need to go into BIOS and enable it.
- BIOS Mode: Legacy — This one’s a bigger problem. It means Windows was installed in old CSM mode. You can’t just flip Secure Boot on without converting your drive to GPT first, or doing a clean Windows install.
- Secure Boot State: Unsupported — Your motherboard probably predates 2016 and doesn’t have real UEFI support. Battlefield 6 genuinely won’t run on this hardware without a motherboard upgrade.
How to Enable Secure Boot (The CSM Issue)
The thing that trips most people up is something called CSM (Compatibility Support Module). It’s a legacy mode that lets modern boards behave like old BIOS systems — but it’s completely incompatible with Secure Boot. You can’t have both at the same time.
![]() Read this before you touch anything: For Secure Boot to work, your Windows drive needs to be formatted as GPT. If it’s still on MBR — which is common on PCs originally set up years ago — turning off CSM will stop your PC from finding Windows entirely. It’ll just dump you into the BIOS every boot. To check, right-click Start, open Disk Management, right-click Disk 0, go to Properties, then Volumes. If it says “Master Boot Record (MBR)”, stop here and use the MBR2GPT tool to convert it first.
Read this before you touch anything: For Secure Boot to work, your Windows drive needs to be formatted as GPT. If it’s still on MBR — which is common on PCs originally set up years ago — turning off CSM will stop your PC from finding Windows entirely. It’ll just dump you into the BIOS every boot. To check, right-click Start, open Disk Management, right-click Disk 0, go to Properties, then Volumes. If it says “Master Boot Record (MBR)”, stop here and use the MBR2GPT tool to convert it first.
![]() General steps that work on most boards:
General steps that work on most boards:
1. Restart your PC and spam the BIOS key on startup. Usually Del for ASUS, MSI, and Gigabyte, F2 for Dell and Acer, or F12 on some systems.
2. If you land in a simplified “Easy Mode” interface, switch to Advanced Mode — usually F7.
3. Head to the Boot tab and look for something called CSM Support, Legacy Support, or CSM Compatibility.
4. Set it to Disabled. The screen might flicker for a second — that’s normal.
5. Now navigate to the Security tab or the Secure Boot submenu under Boot.
6. Switch Secure Boot to Enabled.
7. If there’s a “Secure Boot Mode” option, make sure it’s set to Standard, not Custom.
8. Hit F10 to save and exit.
Motherboard Specific Instructions
Every manufacturer does BIOS menus slightly differently, which is frustrating. Here’s exactly where to find everything on the most common gaming board brands.
![]() ASUS (ROG, TUF, Prime):
ASUS (ROG, TUF, Prime):
- Get into Advanced Mode with F7. Go to the Boot tab.
- Open CSM (Compatibility Support Module) and set “Launch CSM” to Disabled.
- Back on the Boot tab, open the Secure Boot submenu.
- Change OS Type from “Other OS” to Windows UEFI Mode. On ASUS boards, this is the actual toggle that enables Secure Boot.
- Still showing as off? Go into Key Management and click “Install Default Secure Boot Keys.” That usually fixes it.
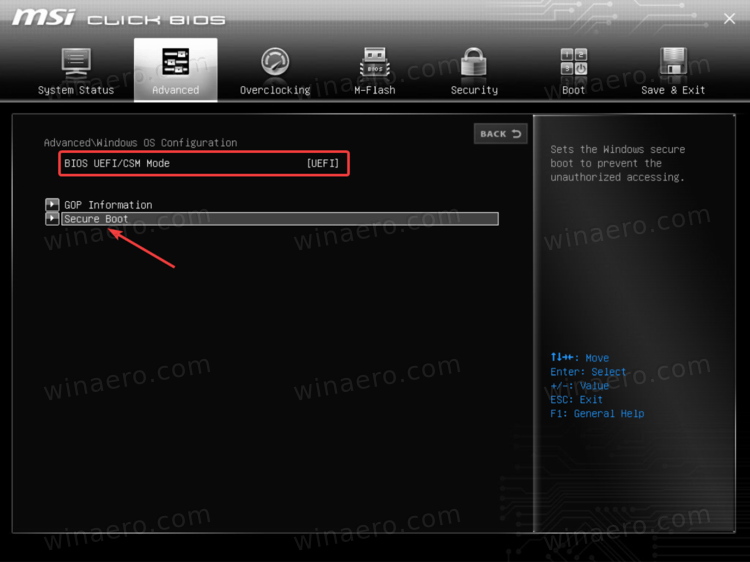
![]() MSI (Click BIOS 5):
MSI (Click BIOS 5):
- Go to Settings → Advanced → Windows OS Configuration.
- Set BIOS UEFI/CSM Mode to UEFI.
- While you’re in that same menu, scroll down and find the Secure Boot option.
- Enable it.
- If it gives you a warning about Custom mode, switch “Secure Boot Mode” to Standard. If Standard isn’t available, go into Key Management and enroll the factory default keys from there.
![]() Gigabyte / AORUS:
Gigabyte / AORUS:
- Go to the BIOS tab (sometimes labeled Boot depending on your firmware version).
- Find CSM Support and disable it.
- Important note for Gigabyte users: A lot of these boards hide the Secure Boot menu until after you save and restart. If you can’t find it, just save with F10, reboot, re-enter BIOS, and it should be there now.
- Navigate to Boot → Secure Boot and enable it.
- If it shows “Mode: Setup,” click “Restore Factory Keys” and it’ll switch to active User Mode.
Troubleshooting Errors
Even when you think you’ve done everything right, things sometimes don’t work. Here’s how to deal with the errors that come up most often.
![]() “Platform is in Setup Mode” / “Binding Not Possible”:
“Platform is in Setup Mode” / “Binding Not Possible”:
If msinfo32 still shows Secure Boot as Off even though your BIOS says it’s enabled, the issue is that no security keys are installed yet.
- How to fix it: Go back into BIOS, find Secure Boot, then Key Management.
- Look for an option that says Restore Factory Keys, Install Default Keys, or Enroll Platform Key — the naming varies by board.
- Confirm it. The status should flip from “Setup Mode” to “User Mode.” Save and exit, and you should be good.
![]() Black Screen or Boot Loop After Changing BIOS:
Black Screen or Boot Loop After Changing BIOS:
This is the scary one. Usually happens when the boot drive is still MBR, or very rarely, when the GPU doesn’t support UEFI output.
- Emergency fix: Unplug the power cable from the wall. Open your case and find the small round silver battery on the motherboard — that’s the CR2032 CMOS battery. Pull it out carefully. Hold the case power button for about 30 seconds to drain any remaining charge. Leave it for 5 minutes. Put the battery back, plug in the power, and boot up. This resets everything in BIOS back to factory defaults including re-enabling CSM, so Windows will load normally again.
Battlefield 6 vs. Valorant Anti-Cheat
![]() If you already play Valorant, this whole setup will feel pretty familiar. Both Riot’s Vanguard and EA’s EAAC are built around the same idea of a verified boot chain. The good news — if Valorant runs on your PC without issues, Battlefield 6 will too. No extra BIOS work needed.
If you already play Valorant, this whole setup will feel pretty familiar. Both Riot’s Vanguard and EA’s EAAC are built around the same idea of a verified boot chain. The good news — if Valorant runs on your PC without issues, Battlefield 6 will too. No extra BIOS work needed.
- One difference worth knowing: Vanguard runs its kernel driver from the moment you turn on your PC to the moment you turn it off. EAAC is a bit more restrained — it loads the driver when you open the game and removes it when you close it. Some people care about this, most don’t.
- One thing you can’t do: Switch Secure Boot on for gaming and off for everything else. Once your system is running in UEFI mode with Secure Boot enabled, that’s just how your PC works now. Which is honestly fine — it also protects against real malware and ransomware, not just game cheats.